Reinforcing and implementing concrete stairs
01/01/2024 Share :
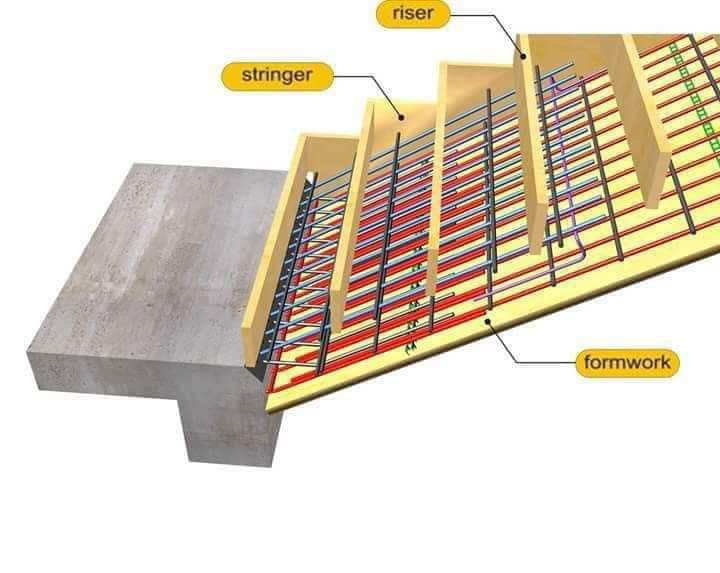
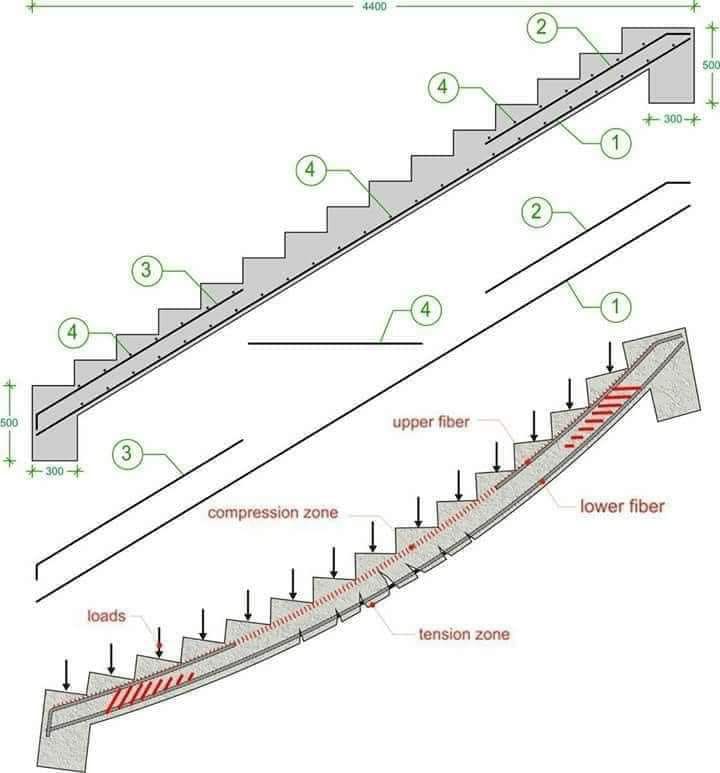
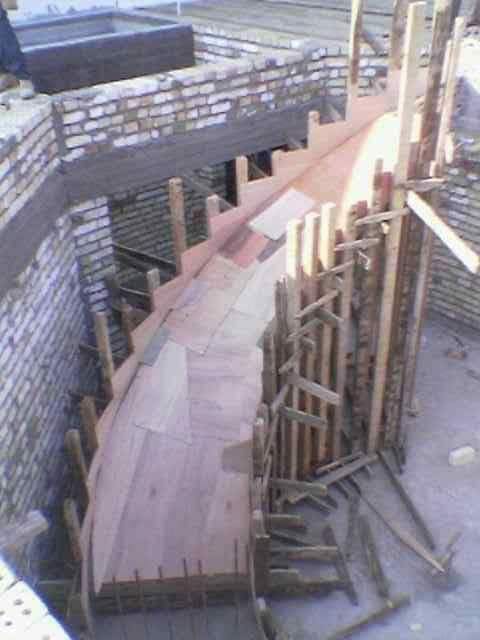
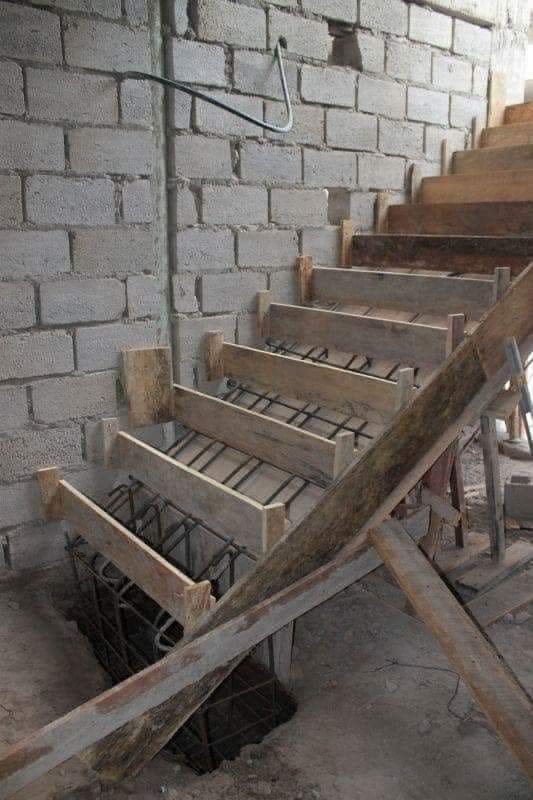
Lec. Dr. Riyadh Abd Al-Abbas<br />The ladder calculation must be done when implementing the foundations, meaning that marking the beginning of the ladder is marked with a cm. It is known that the beginning of the ladder is the first step of the ladder.<br />In some cases, there is no drawing in the drawings below the beginning of the staircase because the staircase columns are far from the beginning and at the end of the shell or platform.<br />In this case, a ladder must be made under the starter to place the signs in it. However, if the ladder poles are next to the starter, as in the picture, in this case a ladder must be made under the starter to place the signs in it. However, if the ladder poles are next to the starter<br />After that, we put the carpentry to apply the first staircase core. If the staircase has two cores and the level of a half-floor tread or shell is + 1.50 metres, for example, and the thickness of the concrete is 0.15, then the carpentry level or shell application will be +1.35, and the core application carpentry is as in the drawing, so that the following is achieved. The thickness of the core concrete, let it be 15 cm. The height of the first step of the ladder, which is the beginning of the ladder, is 20 cm, not 15 cm<br />There is a very important note in the carpentry of the ladder shell<br />If the width of the shell concrete is 1.20, then the width of the shell joinery<br />0.71 metres<br />The width of the shell carpentry varies according to the width of the concrete shell on the engineering plate, and this size can be determined in AutoCAD by drawing the ladder with its actual dimensions.<br />The height of the first step, which is the beginning of the ladder, is different from the rest of the steps<br />Its height will be 20 cm. This is before finishing, because the finishing of the floor below it will be 10 cm.<br />But the finishing of the step is 5 cm marble, so the height of the first step or the base after finishing is 15 cm<br />About the spiral staircase<br />It is architecturally designed as part of a circle or arc according to the available space or space<br />The center of the circle is determined to determine the sides of the ladder, as well as to divide the steps<br />As for the circular staircase<br />Its design is based on a circular column in the center of the staircase<br />The reinforcement of the circular staircase depends on the concrete column located at its centre<br />The main armament is iron forks, such as cantilever iron<br />This fork rests on the column and ends with a leg inside the concrete column<br />Details of reinforcement for stairs<br />The ladder<br />Details of spiral staircase reinforcement<br />The idea of this ladder is that you occupy the heart of the ladder like a beam<br />(The spiral staircase) The idea of this staircase is that you occupy the heart of the staircase like a beam (The spiral staircase)<br />This is a sector in the heart of peace, a sector in the heart of peace<br />Secondly - Making a wooden mold. Making a wooden mold requires knowledge of the following things: -<br />1- Ladder center point ((m))<br />2- The radius of the ladder is n<br />3- Ladder width<br />4- The height of the bay<br />5- Ceiling height<br />6- The end point of the ladder<br />The ceiling height is calculated from the floor slab and the roof slab surface<br />Third - Implementing the template: -<br />1- Install a stake (at the center point of the ladder)<br />2- Fix a lightweight metal tube on the stake in a vertical manner, and the length of the tube is not less than the height of the ceiling, and tie it from the top so that it maintains its verticality during work.<br />3- Marking marks on the pipe. The distance between one mark and another represents the height of the pipe<br />4- Tie a construction thread to a round ring and attach the ring to the metal tube so that the thread can be rotated around the tube and also moved up and down.<br />Fourth - Accounts:-<br />1- The reasonable height of the gate ranges from (10-20) cm and is determined based on the available space because the lower the height of the gate, the length of the perimeter of the staircase will increase.<br />Example :-<br />Let us assume that we want to make a staircase with thresholds (beys) of a height of (15 cm) and that the height of the ceiling is (340 cm), so the staircase will contain: -<br />340 /15 = 22.66cm<br />This is unreasonable because the number of bytes must be an integer, so we round this number to the nearest integer, which is 23cm<br />That is, the scale must contain 23 verses<br />So<br />340/23 = 14.78 cm<br />This is the true height of the bay<br />2- The length of the verse = the width of the ladder<br />3- The width of the bean bag is not less than 28 cm from the middle<br />4- By knowing the radius of the inner ladder and the width of the ladder (the length of the verse), it is possible to know the radius of the circle whose circumference passes through the middle of the verses of the ladder.<br />Let us assume that the width of the internal ladder = (175 cm) and the width of the ladder = (120 cm)<br />Average van = (120/2) + 175 = (23 cm)<br />The length of the circumference of the middle ladder = 235 * 2 * 30.14 = (1475 cm)<br />1475/28 = (52.67 verses)<br />Inner circumference length = 175*2*3.14 = (1099 cm)<br />1099/52.67 = 20.86 cm, the inside width of the bag<br />The net of the outer ladder = 175 + 120 = 295 cm<br />Length of the outer circumference = 295 * 2 * 3.14 = 1852 cm<br />Width of the bag from the outside = 1852.6 / 52.67 = 35.17 cm<br />Now it has become known to us:<br />Bay length = 120 cm<br />Inner bean width = 20.86 cm<br />External bay width = 35.17 cm<br />Bean height = 14.78 cm<br />Fifth - Implementation:-<br />1- We take a wooden board (opposite) and start drawing the side of the inner ladder, that is, we draw a ladder with a height = 14.78 cm and a width = 20.68. We also draw the side of the outer ladder, height = 14.78 cm and width = 35.17.<br />2-- We draw a straight line at the bottom of the verses, at a vertical distance of no less than 10 cm from the inner corner of the verse. Thus, we have completed the external and internal sides of the ladder.<br />3- We cut the drawn part, which will be the side projection of the staircase (internal and external).<br />4- After that, we install the sides on wooden supports, making use of the string that we had previously fixed on the vertical column in the installation process to keep all the stairs facing towards the center. After that, the inside of the staircase (the platform) is lined with small pieces of wood, and then the layers are cut ( Opposite) and fixed on the ladder<br />Sixth: Armament<br />1- The skewers that were previously fixed to the base are folded onto the ladder<br />2- Arm the ladder rail with 16 mm skewers and a suitable length to ensure that they overlap with the ceiling tiles at a distance of not less than half the length of the ladder and with a number equal to the number of skewers at the base.<br />3- Complete the reinforcement of the ladder mat with transverse skewers with a diameter of 12 mm and a distance of (10-15 cm) between one skewer and another.<br />4- Raise the mat from the wood at a distance of not less than (2 cm). Secondly - Making the wooden template. Making the wooden template requires knowing the following things: - 1- The center point of the ladder ((m) 2- The radius of the ladder 3- The width of the ladder 4- - The height of the beam 5- The height of the ceiling on 6- The end point of the ladder The height of the ceiling is calculated from the floor slab and the surface of the ceiling slab Third - Implementing the template: - 1- Installing a stake (at the center point of the ladder) 2- Installing a lightweight metal tube on the stake in a vertical and long way The pipe must not be less than the height of the ceiling and tie it from the top so that it maintains its verticality during work. 3- Mark marks on the pipe. The distance between one mark and another represents the height of the column. 4- Tie a construction thread to a round ring and cover the ring with the metal tube so that it is possible to rotate the thread around the tube and also move it up and down. Fourth. - Calculations: - 1- The reasonable height of the verse ranges from (10-20) cm and is determined based on the available space because the lower the height of the verse, the length of the perimeter of the staircase will increase. Example: - Suppose we want to make a staircase with thresholds (beys) of a height (15 cm) and the height of the ceiling is (340 cm), so the ladder will contain: - 340 / 15 = 22.66 cm. This is unreasonable because the number of bytes must be an integer, so we round this number to the nearest integer, which is 23 cm, meaning that the ladder It must contain 23 verses, so 340/23 = 14.78 cm, and this is the true height of the verse. 2- The length of the verse = the width of the ladder. 3- The width of the verse is not less than 28 cm from the middle. 4- By knowing the radius of the inner ladder and the width of the ladder (length of the verse It is possible to know the radius of the circle whose circumference passes through the middle of the verses of the staircase. Let us assume that the circumference of the inner staircase = (175 cm) and the width of the staircase = (120 cm), then the circumference of the middle staircase = (120/2) + 175 = (23 cm) and the length of the circumference of the middle staircase is = 235*2*30.14 = (1475 cm() 1475/28 = (52.67 bytes) Inner perimeter length = 175*2*3.14 = (1099 cm) 1099/52.67 = 20.86 cm width The inside of the gate = 175 + 120 = 295 cm The length of the outer circumference = 295 * 2 * 3.14 = 1852 cm The width of the gate from the outside = 1852.6 / 52.67 = 35.17 cm Now it has become known to us: - Beam length = 120 cm Internal bead width = 20.86 cm External bead width = 35.17 cm Bead height = 14.78 cm Fifth - Implementation: - 1- We take a wooden board (opposite) and start drawing the side of the inner staircase, that is, we draw a ladder Bead height = 14 78 cm and its width = 20.68. We also draw the side of the outer ladder, height = 14.78 cm and width = 35.17. 2- We draw a straight line under the verses, a vertical distance from the inner corner of the verse of no less than 10 cm. Thus, we have completed the outer and inner sides. For the ladder 3- We cut the drawn part, which will be the side projection of the ladder (internal and external). 4- Then we install the sides on wooden pillars, making use of the string that we had previously fixed on the vertical column in the installation process to keep all the pillars of the ladder facing towards the center afterwards. The stair tread is lined from the inside (the run) with small pieces of wood, and then the layers are cut (opposite) and fixed on the ladder run. Sixth: - Reinforcing 1- The skewers that were previously fixed to the base are bent onto the stair run. 2- The stair run is reinforced with 16 gauge skewers. mm and of a suitable length to ensure that it overlaps with the ceiling tiles at a distance of not less than half the length of the ladder and with a number equal to the number of skewers at the base. 3- Complete the reinforcement of the stair mat with transverse skewers with a diameter of 12 mm and a distance (10-15 cm) between one skewer and another. 4- Raise the mat from the wood by a distance Not less than (2 cm)<br />Note: Use scissors if the angle is greater than 15. Note: Use scissors if the angle is greater than 15.<br />